
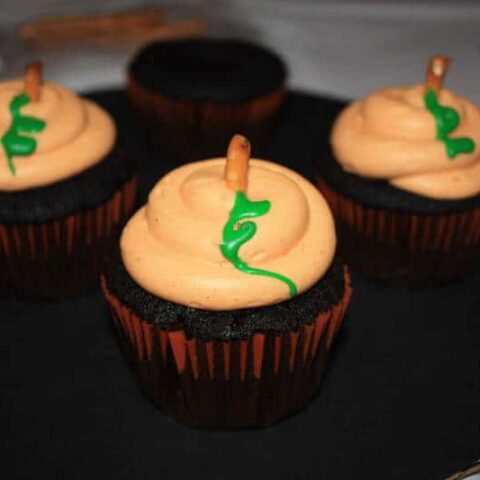
Black Velvet Cupcakes Pumpkin Tutorial
It's Halloween... so yeah, I'm making Black Velvet Cupcakes. Are they any different from red velvet, white velvet or green velvet... not really, but they sure are spookier! This Black Velvet Cupcakes Pumpkin Tutorial will make your next Halloween party super sweet!

Pumpkin Frosting Tutorial
Supplies
Large round tip + piping bag
Pretzel sticks
Green decorating icing (small tube you can get in the baking isle at the grocery store)
Orange frosting (I used cream cheese frosting above and tinted it orange with food coloring)
Technique
- Attach the large round tip to your pastry bag and fill with orange frosting.
- Pipe a tall/wide mound of frosting onto your cupcake.
- Break a pretzel stick in half and place in the top of the frosting until about ⅔ cm is showing.
- With the green decorators icing, pipe on the vine in a curly q pattern.
- Enjoy!

Yield: 1 dozen cupcakes
Black Velvet Cupcakes
Prep Time
30 minutes
Cook Time
17 minutes
Total Time
47 minutes
Ingredients
Black Velvet Cupcakes
- 4 Tablespoons unsalted butter, at room temperature
- ¾ cup sugar
- 1 egg
- 2 ½ Tablespoons unsweetened cocoa powder
- 3 Tablespoons black food coloring
- ½ teaspoon vanilla extract
- ½ cup buttermilk
- 1 cup plus 2 Tablespoons all-purpose flour
- ½ teaspoon salt
- ½ teaspoon baking soda
- 1 ½ teaspoons distilled white vinegar
Cinnamon Cream Cheese Frosting
- adapted from Hummingbird Bakery Cookbook
- 2 ⅓ cups powdered sugar, sifted
- 3 Tablespoons butter, room temperature
- 4 ounces cream cheese, cold
- scant ¼ teaspoon ground cinnamon
- ¼ teaspoon of vanilla extract
Instructions
Black Velvet Cupcakes
- In the bowl of a stand mixer fit with a paddle attachment, cream the butter and sugar until light and fluffy, about three minutes. Turn mixer to high and add the egg. Scrape down the bowl and beat until well incorporated.
- In a separate bowl mix together cocoa, vanilla and black food coloring to make a thick paste. Add to the batter, mixing thoroughly until completely combined. You may need to stop the mixer to scrape the bottom of the bowl, making sure that all the batter gets color.
- Turn mixer to low and slowly add half of the buttermilk. Add half of the flour and mix until combined. Scrape the bowl and repeat the process with the remaining milk and flour. Beat on high until smooth.
- Turn mixer to low and add baking soda and white vinegar. Turn to high and beat a few more minutes.
- Spoon batter into a paper lined cupcake baking pan and bake for 20-25 minutes at 350 F degrees or until a skewer inserted into the center cupcake comes out clean.
- Let rest in the pan for 10 minutes, then place them of a cooling rack to cool completely before frosting.
Cinnamon Cream Cheese Frosting
- Beat the powdered sugar, cinnamon, and butter together in the bowl of a stand mixer fit with a paddle attachment. Mix on medium-slow speed until it comes together and is well mixed.
- Add the cream cheese all at once and beat on medium to medium-high until incorporated.
- Add the vanilla and mix until incorporated.
- Turn the mixer to medium-high and beat for 5 minutes, or until the frosting becomes light and fluffy.
- Do not over-beat as the frosting can quickly become runny.


Great website and content too. Thank you for this useful article!
I am COMPLETELY addicted to your site. Can't wait to try this one next.
Thank you Jen!!! Let me know how they turn out when you make them!!! Take pictures!
What temperature do you bake these black velvet cupcakes? I'm guessing 350!? Help! ajb
350 F degrees!