
Pumpkin Cake Balls & Pops
I got the Bakerella "Cake Pops" book (signed of course!) and I was inspired to try her cake balls and pops again. I had tried them about 18 months ago and it was a complete DISASTER!
This time... well, it was half disaster and half success. You see... I have never used candy coating before nor have I ever coated anything I've ever made (other than dipping cupcakes in ganache... but that's different). So this cake ball thing is VERY new to me and you could say that I'm a "Cake Ball Virgin" haha.
To begin with... I used some left over cake and store bought jar frosting to make the balls. Rolled them and froze them. That was the easy part. And to be honest, they turned out pretty darn good up to this point!
What I learned making these balls...
- Blenders do not work to break up cake into little pieces
- But... whisks do!

And then comes the candy coating. I melted the candies in a deep bowl like Bakerella suggested and then started coating my balls. (Hahahah, sorry... I can't help but laugh right now because of what I just typed. Coating my balls. Go ahead, laugh. You know you want to. ) The candy coating seemed thick, but because I'm not good yet at these cake ball things, I wasn't quite sure if it was something I was doing or the candy melts or what. Here are a few of the disasters...

I noticed too that the edible ink pen I bought wasn't working either.... I think I'll need to invest in the brand that Bakerella uses and not just whatever JoAnn's has in stock. So... no Jack-O-Lanterns for these pumpkins!

After these disasters, I took matters into my own hands and went to Twitter. I asked my followers what the heck my issue was! I got a lot of the same answer... it's too thick, add oil or shortening! I thought, well... I've got nothing to lose, might as well try! I heated up another package of candy melts, this time adding 1tbsp of vegetable shortening (I had Crisco on hand). I also added another 30 seconds of heating time in the microwave and got it really good and warm to make sure that everything was melted!
SHAZAAM!! It was thinner! Halleluia!! And... the balls were coating so much smoother now!! After about 5 or 6 I had them down!
Another little trick I figured out was to use a toothpic when getting the ball off my spoon and onto the wax paper... this made it a smooth transition and any bumbs I'd made from touching it would be on the underside. Too bad I figured that out when I only had 5 balls left to coat!
Oh well... ya live and learn.
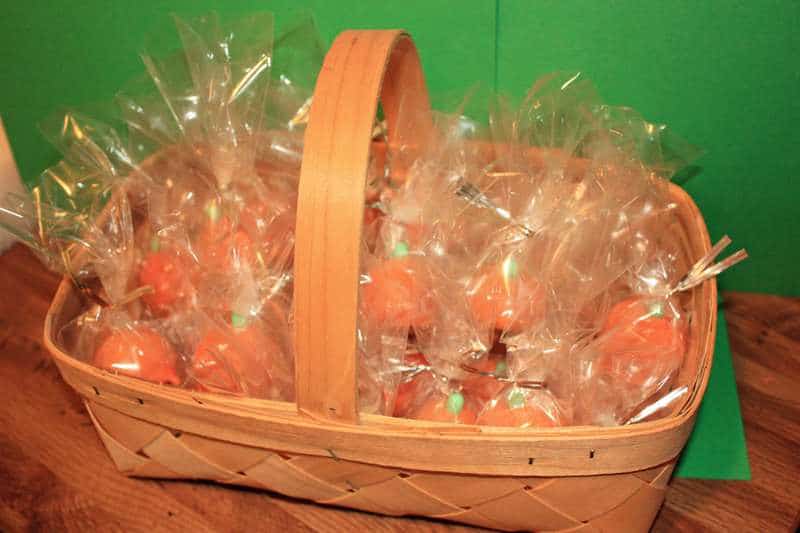
Here are the best of the best of the cake balls!! Oh... and one pop!


I individually wrapped the cake pops in little bags with ties and put them in a cute basket so my daughter can take them to her class tomorrow!! So cute! They make the perfect bite size treats for her classmates!


Thanks! I could have written the same story last night, pics and all. I appreciate the tips about the oil. I used Wilton candies too and it was too thick. And the Wilton markers, total waste of money. 🙁
I love them! The most important thing is that so will your daughter and her class.. it is just impossible not to when you have cake and candy all bite size.
What did you use to get the orange color? I tried the Wilton candy tint and to get it that orange I would've had to use the entire jar!
Taylor...
I used the Wilton Candy Melts that came in the orange color!! I got them at JoAnn Fabrics in Tacoma! 🙂 Hope that helps!
Thank you! I'll be on the lookout for them!
Thank you so much!! I thought I was the only one who couldn't dip cake balls. Mine looked so horrible. Thank you for the tip about the vegetable shortening. Would vegetable oil also work? Now I need to try making cake balls again so I can redeem myself. Thank You!!
I had a couple suggestions from people saying that oil would work too... but I haven't tried that personally, so I'm not sure for certain!
They look Great. I'm gonna try these soon. As for thinning out the chocolate I wouldn't use oil, that could be a total disaster, stick with using shortening (or even a bit of butter) but never straight up oil, it could seize your chocolate.
try dipping the stick into chocolate and then into the balls and let it set a few minutes, this will allow you to just dip them right into the chocolate with no problem, you might even chill it a few minutes, then the chocolate acts like glue and makes life easier,,hope this helps
What did you use for the green stem?
It's a green TicTac! 🙂
Brilliant! Thank you 🙂