
Tie Dye Tuesday - Tie Dye Cookies
These fun tie dye cookies make a big impression and are a perfect addition to a tie dye themed party!

I'm back with another Tie Dye Tuesday post and this week I'm sharing how I created these adorable Tie Dye Cookies!
Make sure to check out the rest of the Tie Dye Tuesday series including Tie Dye shirts and my Tie Dye Party!
![]()
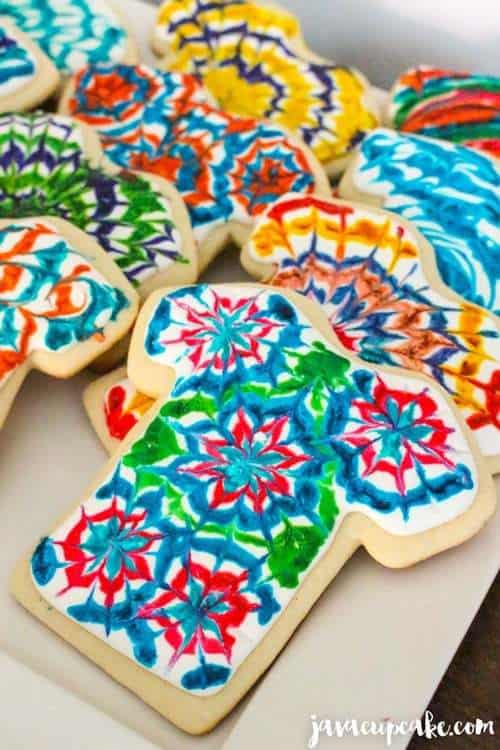
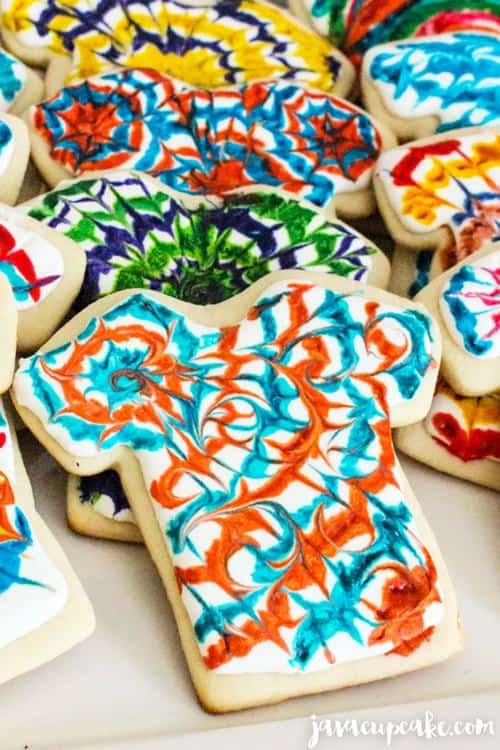
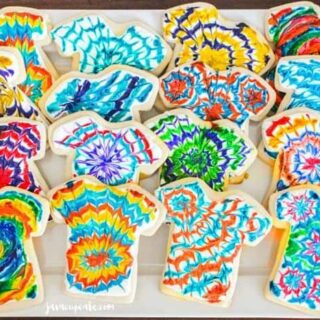
When I was brain storming ideas on what to make for this party, I knew I wanted to make tie dye themed cookies with my sugar cookie recipe but it wasn't until my friend Amanda suggested I use t-shirt cookie cutters that the idea really came to life!
The t-shirt shape of these cookies paired with the tie dye design make them impossible not to love!
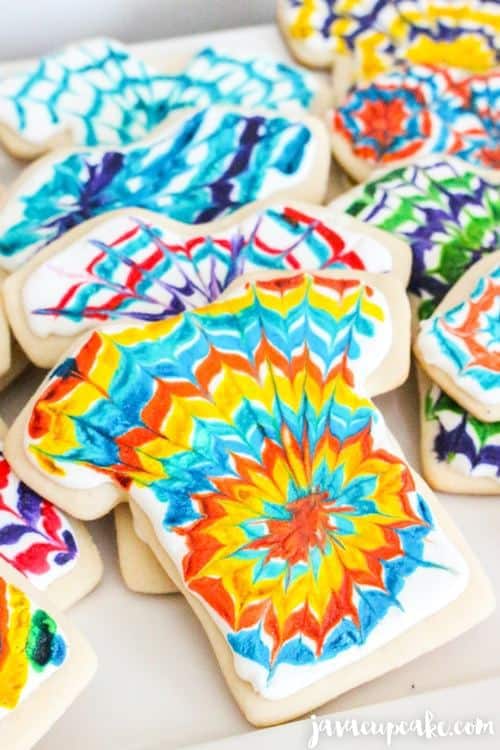
I got the idea to paint these cookies with dye from SweetAmbs. She has a great video tutorial on how to do it, so if you need more guidance make sure to check it out!
The process was really simple and I even got my husband to help me out with it! He had fun and honestly created some better looking tie dye designs than I did!
Making these tie dye cookies shouldn't be limited to just a tie dye party! They'd be great for any celebration to add a bit of color, flair and deliciousness!
Let me know if you try them! I'd love to see how your creations turn out!
Happy Baking!
Tie Dye Tuesday - Tie Dye Cookies
Ingredients
Cookies
- 1 cup unsalted butter, room temperature
- ½ cup shortening
- 2 cups sugar
- 4 eggs
- 2 tablespoon vanilla extract
- 5 cups all-purpose flour
- 2 teaspoon baking powder
- 2 teaspoon salt
Royal Icing
- 1 kilo confectioners sugar
- 10 tablespoons meringue powder*
- 180 mL water
- 1 teaspoon vanilla extract
- 1 pinch salt
Decorating
- Wilton gel food colors
- New paint brushes
- Vodka or other clear liquor
- Toothpicks
- Paper towels
Instructions
Cookies
- In the bowl of your stand mixer, cream the butter and shortening together until smooth. Scrape the sides of the bowl.
- Add the sugar and beat on high until incorporated.
- One at a time, add the eggs and beat well after each addition. Mix on high for 1 minute until pale yellow and fluffy.
- Mix in the vanilla.
- In another bowl, whisk together the flour, baking powder and salt.
- Add this mixture to the butter and sugar and mix until just combined.
- Cover with plastic and refrigerate 2 hours or over night.
- When ready to bake, preheat oven to 400 F degrees and line a cookie sheet with parchment paper.
- On a floured counter, knead the dough 2-3 times until smooth. Roll out cookie dough to about ⅛" thick. Cut out tshirt shapes with a cutter and place on the cookie sheet 1" apart. Repeat until all the dough has been used.
- Bake for 6-7 minutes or until the edges are SLIGHTLY brown. DO NOT OVER BAKE!!
- Allow to cool on the pan for 1-2 minutes before removing to a wire rack to cool completely.
Royal Icing
- Place powdered sugar, meringue powder and salt in the bowl of your stand mixer fitted with the paddle attachment. Mix on low speed until combined.
- Add most of the water, reserving a few tablespoons.
- Add vanilla and mix on medium-low speed until ingredients are combined.
- Add more water if needed... you're looking for a medium consistency similar to soft serve ice cream on the verge of melting. Scrape bowl. Mix for 5 minutes on medium-low speed.
- Immediately cover icing in an air tight container.
Decoration
- In small bowls or a paint tray, mix a dollop of gel coloring with a slash of vodka until you reach a thin paint consistency.
- Fit a Wilton #4 (or small round) tip on a disposable piping bag then fill with royal icing.
- Pipe a thin border of icing along the outside of the cookie then fill it in with more icing. Use a toothpick to smooth out the icing and pop any bubbles. Tap the cookie on your work surface a few times to level out the icing.
- Dip your new & clean paint brush into the desired color of dye and gently paint it onto the still wet icing. It's okay if it spread out on the icing, that's the look we're going for. Make sure not to completely cover the icing with color you want to leave some white to show through. Paint the dye in tie dye shirt like patterns.
- Use a toothpick to pull the color around the cookie. Start from the edge or the center and pull the toothpick across the cookie. There is no right or wrong way to do this! Have fun and experiment.
- Allow the cookies to set/dry overnight. Store in an air tight container.
For your convenience, here are a few of the items I used to make these cookies!


Wow, so many groovy designs! It reminds me of my childhood. Every summer we would tie-dye t-shirts and challenged ourselves to make the very best designs. I love how you were able to get so many fun patterns using the icing.
Oh my goodness, these are so FUN!! And dare I say...look not that hard?? For a sugar cookie moron like myself?? Haha.
I have the hardest time with decorating cookies but I so want to make these! These are awesome and so fun!
I love tie dye! I made several shirts in the Spring for my family. It was so much fun. Love the cookies!