
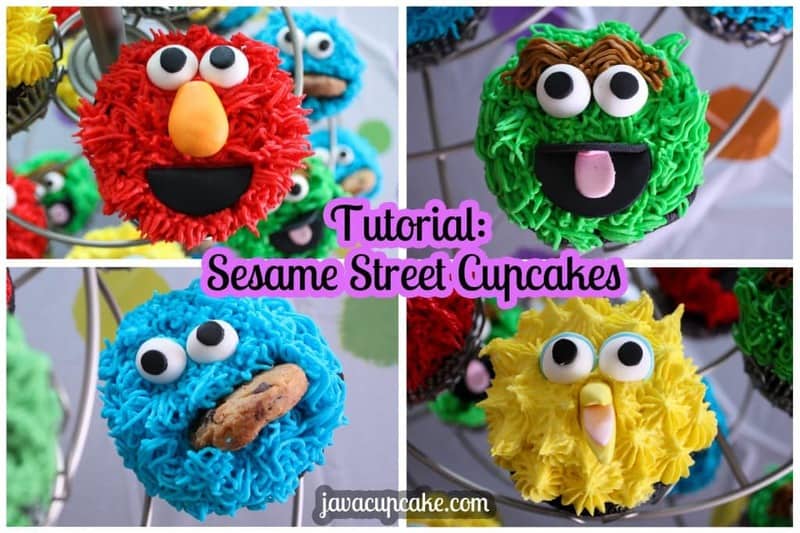
Tutorial: Sesame Street Cupcakes
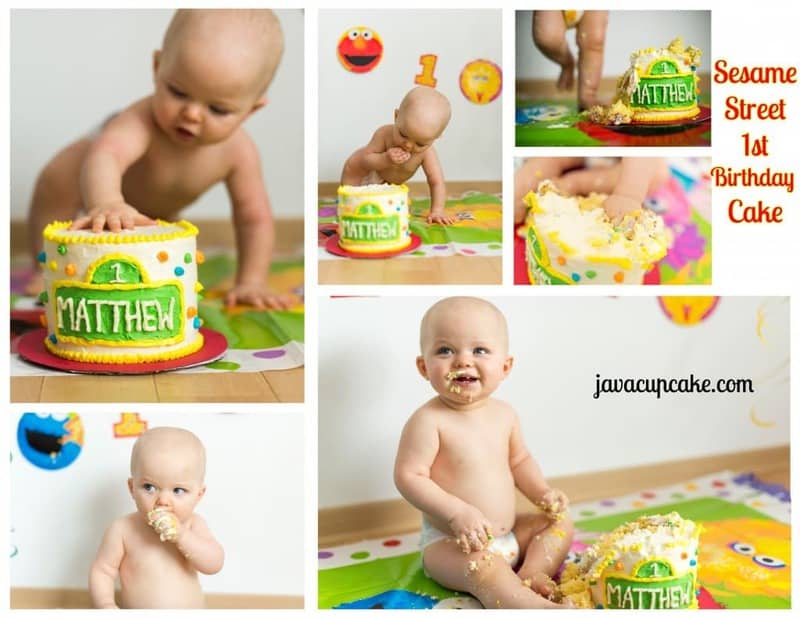
My son celebrated his 1st birthday three times... I may have gone a little bit overboard. But hey - you only turn 1 once! In February we celebrated with a birthday photo shoot with my favorite local photographer Allie Beardsley Photography. She took some amazing photos of my family including Matthew with his smash cake! (You can read all about his smash cake here!)
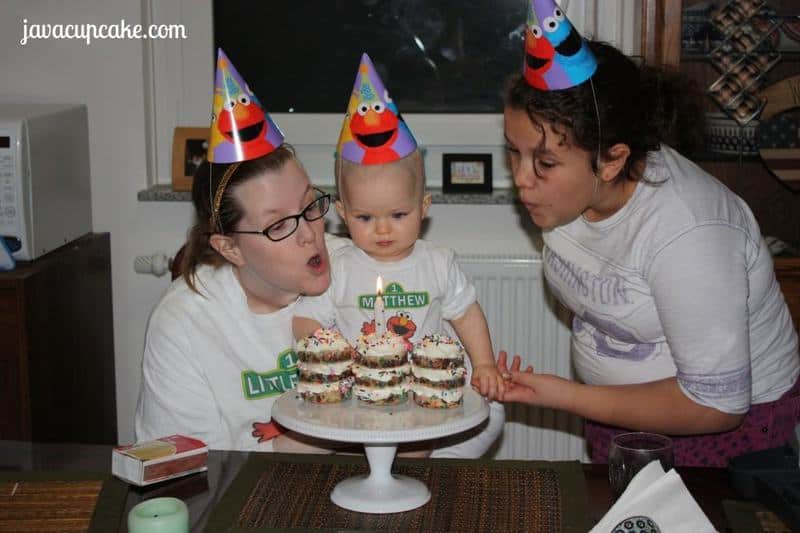
Next up was Matthew's actual birthday on March 5th. We had a small celebration at home with my, his big sister and our neighbors. Unfortunately, my husband was training for deployment and wasn't able to be there. Bummer, I know. But, it was still a fun time! For this celebration, I made funfetti cookie cakelettes filled with buttercream frosting! Super yum!
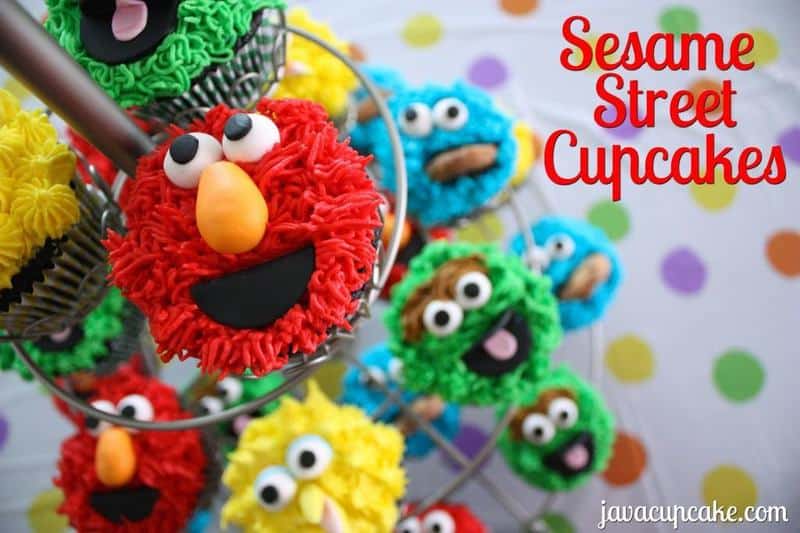
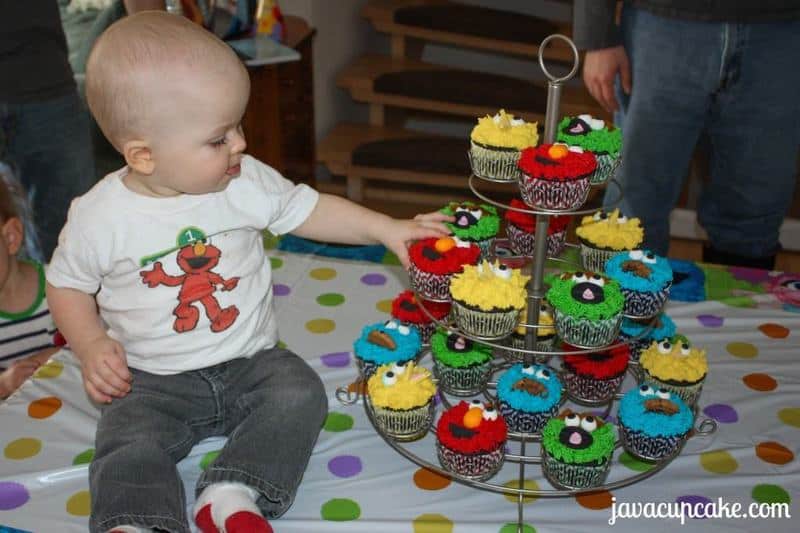
And finally - it's time for Matty's official birthday party! You know - the one where you invite everyone you know and there is food, games, lots of kids and of course CAKE! We celebrated this big party just this past weekend and I teamed up with a local baker, Tiny Kitchen Cakes, to make the Sesame Street themed cupcakes for the party.
I have admired Kathy of Tiny Kitchen Cakes work since I moved to Germany. She can do things with fondant that are so amazing - I wouldn't even know where to begin to make some of the amazing cakes she does! I contacted Kathy in January and asked if she would be willing to help me put together the fondant eyes, noses and mouth/beaks for the Sesame Street cupcakes and without hesitation, she agreed! I was THRILLED because I had no clue how I was going to pull these off without her help!
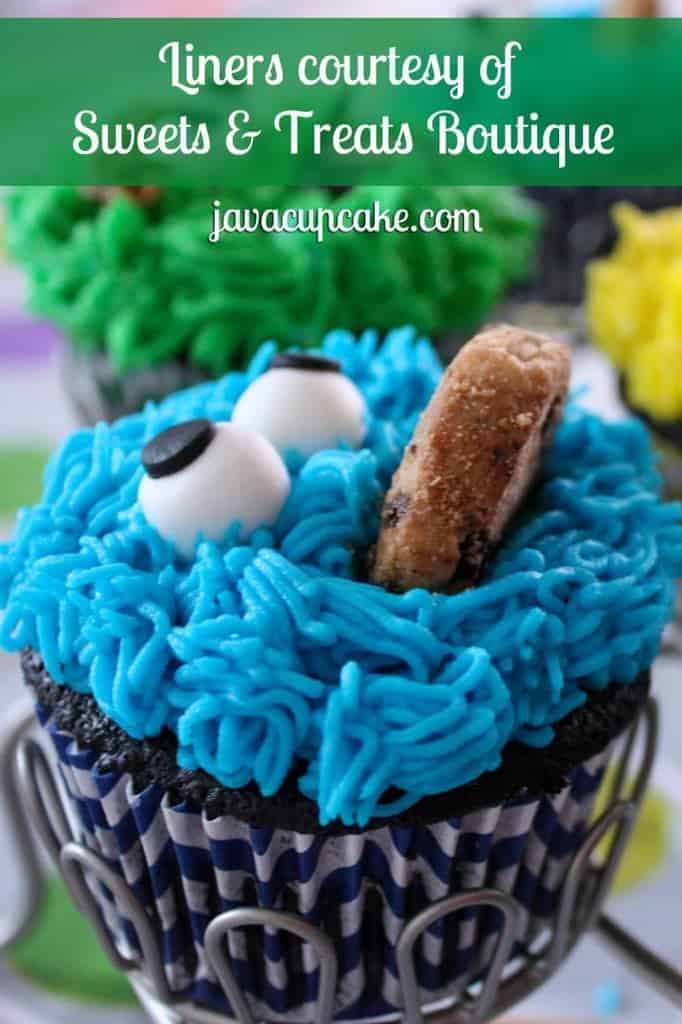
When I baked these cupcakes, I wanted to use matching and coordinating liners for all of them. So I used blue, green, red, and yellow chevron cupcakes all courtesy of Sweets & Treats Boutique. If I haven't said so before, I am completely in love with these liners. The best thing about these liners - they hold up to ANY kind of cake you bake in them. The colors are bright and vibrant and the size makes a perfect cupcake - every time! I may never use another liner ever again!
When it came time to put these cupcakes together it really wasn't too difficult... it just took some planning, time and organization. Kathy of Tiny Kitchen Cakes was generous enough to write a brief tutorial to share with my readers on how she made the fondant pieces... how awesome is that? And really, the process is quite simple.
Please let me know if you have any questions about this process - I'll do my best to answer them for you!!
Good luck and Enjoy!
Eyes, Nose, Mouth & Beak (by Tiny Kitchen Cakes)
Materials:
- white, black, orange, yellow, pink and light blue fondant
- knife
- 1" round cookie cutter
- small oval or leaf cookie cutter
- piping tip
- rolling pin
- straw
- small brush
- clear vanilla extract or vodka
- powdered sugar
Steps:
- 1. Set up your work area with all the tools you will need. Dust work surface with a little powdered sugar.
- 2. Roll white fondant into small ¼" balls. You'll need two eyes for every cupcake you plan to make.
- 3. Roll out black fondant into a thin sheet. Using the end of the straw, cut out circles for the pupils and attach to eyeballs.
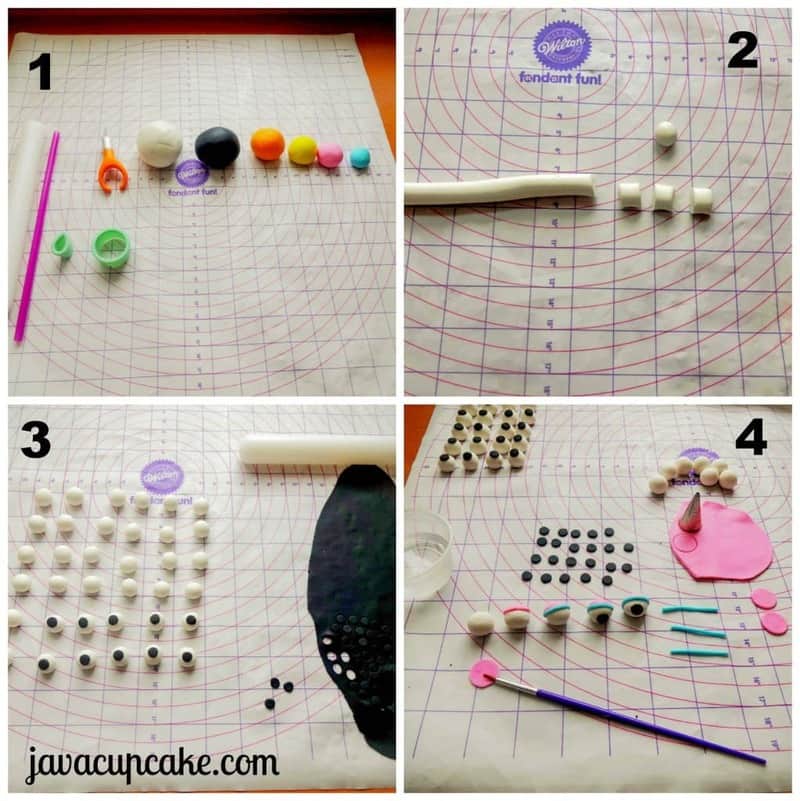 `
`- 4. Roll out pink fondant for Big Birds eyes. With a piping tip cut out circles, carefully attach to eyeballs. Roll 1" thin, lines of blue and attach next to the pink for the eyeshadow. NOTE: If the pieces don't stick, use a very small dab of vodka or clear vanilla extract onto one piece before attaching.
- 5. Roll out black and pink fondant. Using the round cookie cutter cut out circles for the mouth. Cut teardrop shapes of pink fondant and attach to the center of the circle for Oscars tongue. Fold to a 90 degree angle.
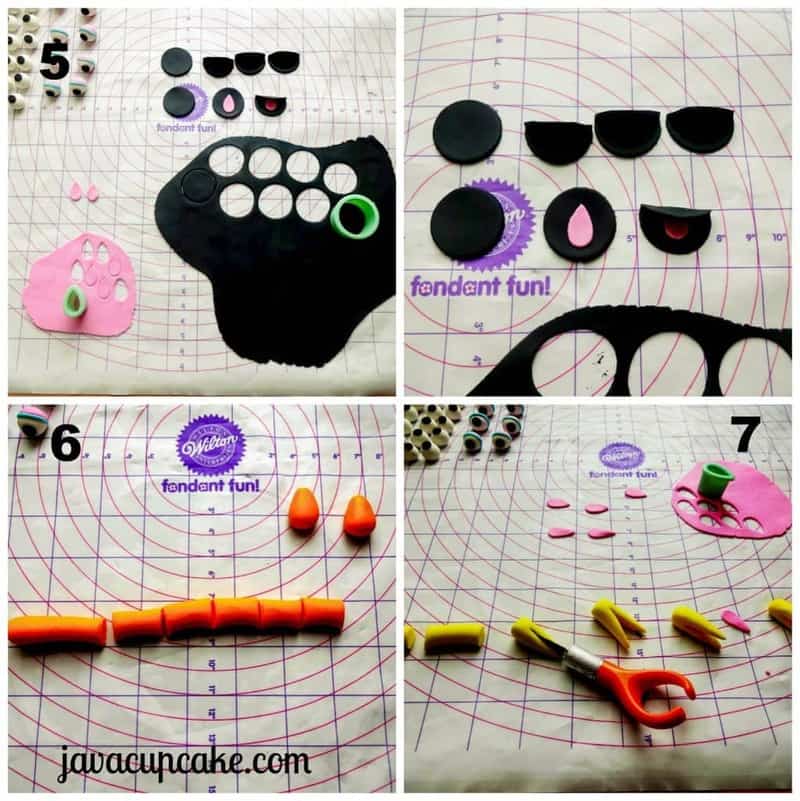
- 6. Using the orange fondant for Elmo's nose, form into an egg shape with one end slightly smaller than the other.
- 7. Form yellow fondant into beak shapes. With a knife cut open the ends and pull apart. Cut pink triangle shapes of fondant and attach as tongue.
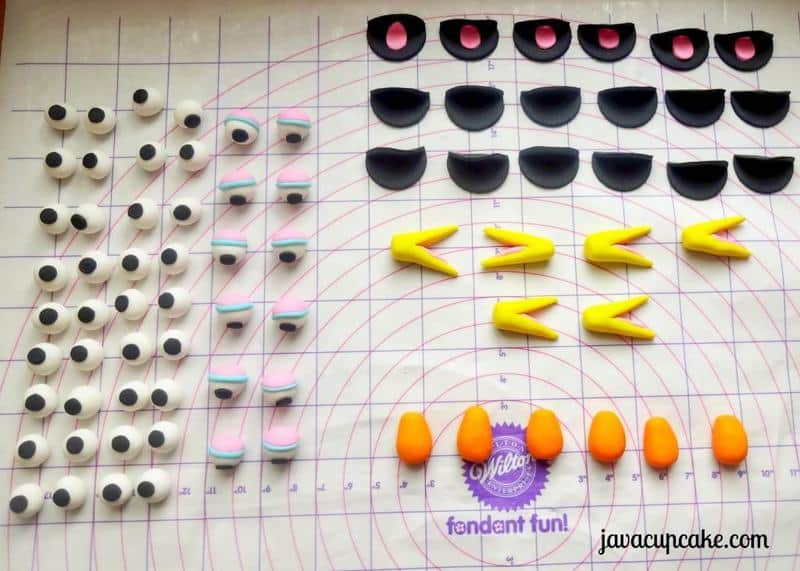
- 8. Store in an air-tight container for up to a month. Best if used with-in a week.
Assembly (by JavaCupcake)
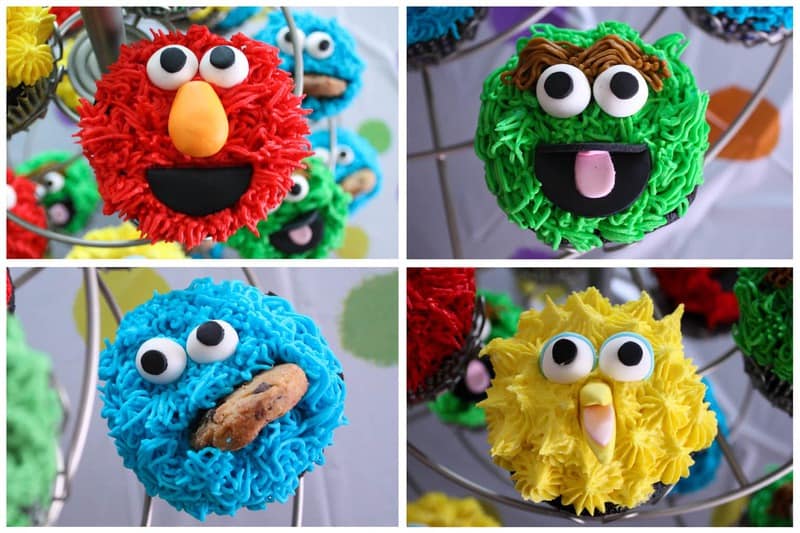
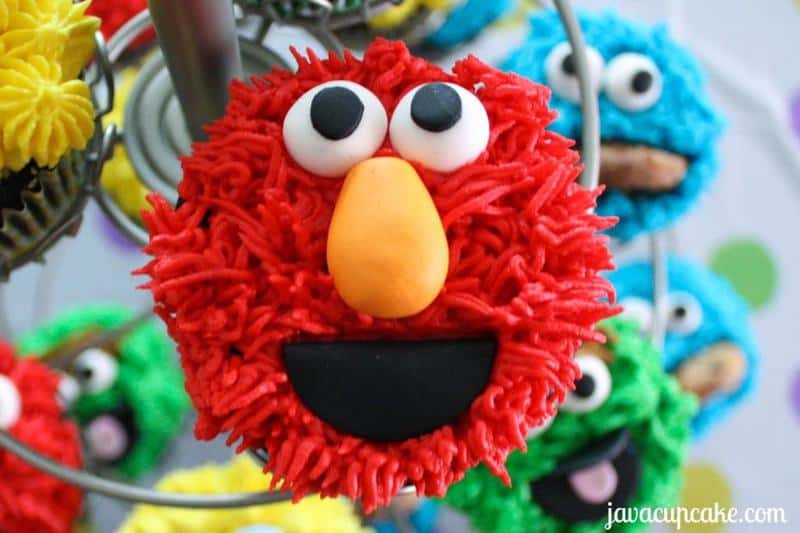
Elmo
Materials Needed
- Cupcakes
- Red frosting
- Eyes, orange nose and black mouth
- Wilton grass tip #233
- Piping bag
Assembly
- 1. Fit the piping bag with the grass tip and fill with red frosting.
- 2. Hold the bag straight up over the cupcake and with medium pressure, squeeze frosting onto the cupcake. In a quick, steady motion, pull bag straight up and release pressure. Repeat this process until the entire cupcake is covered from edge to edge. Apply a second layer of frosting so that a round mound (like a head) is created.
- 3. Position the eyes toward the top of the cupcake so that they are touching. Place the nose directly under the eyes with the fat end toward the mouth. Press the mouth into place under the nose.
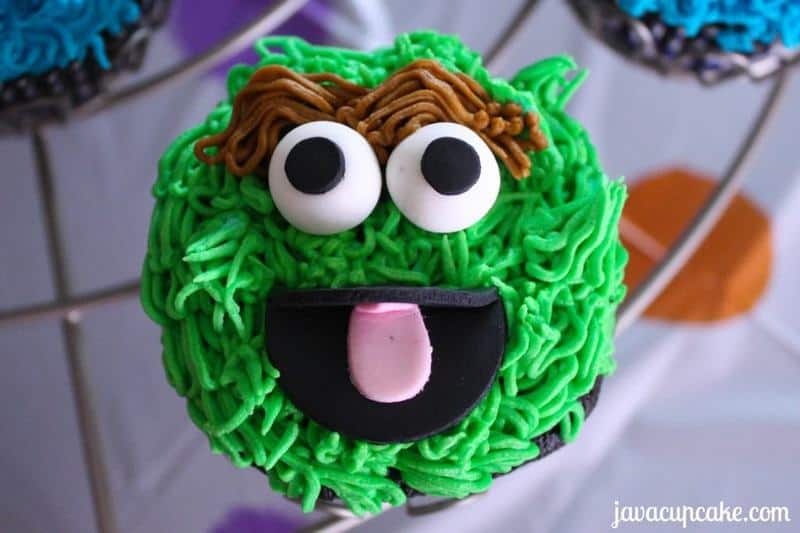
Oscar the Grouch
Materials Needed
- Cupcakes
- Green frosting
- Brown frosting
- Eyes and black mouth with pink tongue
- Wilton grass tip #233
- 2 Piping bags
Assembly
- 1. Fit the piping bag with the grass tip and fill with green frosting.
- 2. Hold the bag straight up over the cupcake and with medium pressure, squeeze frosting onto the cupcake. In a quick, steady motion, pull bag straight up and release pressure. Repeat this process until the entire cupcake is covered from edge to edge. Apply a second layer of frosting so that a round mound (like a head) is created.
- 3. Position the eyes a ⅓ from the top of cupcake so that they are touching. Press the mouth into place under the eyes.
- 4. Fill another piping bag fitting with the grass tip and fill with brown frosting. Pipe a "m" shape above the eyes to create eyebrows.
Cookie Monster
Materials Needed
- Cupcakes
- Blue frosting
- Mini chocolate chip cookies
- Eyes
- Wilton grass tip #233
- Piping bag
Assembly
- 1. Fit the piping bag with the grass tip and fill with blue frosting.
- 2. Hold the bag straight up over the cupcake and with medium pressure, squeeze frosting onto the cupcake. In a quick, steady motion, pull bag straight up and release pressure. Repeat this process until the entire cupcake is covered from edge to edge. Apply a second layer of frosting so that a round mound (like a head) is created.
- 3. Position the eyes a ⅓ from the top of cupcake so that they are touching. Press the cookie into place under the eyes.

Big Bird
Materials Needed
- Cupcakes
- Yellow frosting
- Eyes with eye lids and beaks
- Wilton open star tip #4b
- Piping bag
Assembly
- 1. Fit the piping bag with the star tip and fill with yellow frosting.
- 2. Hold the bag straight up over the cupcake and with medium pressure, squeeze frosting onto the cupcake. In a quick, steady motion, pull bag straight up and release pressure. Repeat this process until the entire cupcake is covered from edge to edge. Apply a second layer of frosting so that a round mound (like a head) is created.
- 3. Position the eyes a ⅓ from the top of cupcake so that they are touching. Press the beak into place under the eyes.

Ok your son is TOOO cute and so are these sesame street cupcakes!!!
I know, right?!? 🙂 hehehe Thanks! I think he's a keeper!
I can't even handle the cuteness!!
Tee hee hee 🙂 Thanks!
These are truly amazing, Betsy. They must taste delicious because they are so obviously filled with love. 🙂 They must have taken forever to do and the results show the effort!
Thank you, Wendy! They were a lot of fun to make!
Hi Betsy, I want make these cupcakes for my sons birthady, can I use Marshmallows fondant.
Yes, you probably could use marshmallow fondant. As for storage, just keep them in an airtight container and they should be okay for at least a week before you need them. As for the frosting... I'd at least double the recipe... it's better to have more than not enough! Good luck... let me know how they turn out and TAKE PICTURES!!!
Hi Betsy, what kind of icing is used for this recipe?
Hi Ben - I used a basic vanilla buttercream from scratch. But you could use any white/vanilla frosting that is study and will hold up to adding a lot of food coloring.
also, can I make the eyes, nose and all the other figures days in advance, how do I store them
and one last thing, do you know in overall how much frosting do I need for 50 cupcakes, I also want to make it in advance and I dont want to go short on frosting, thanks Betsy
Thank you so much for this very informative tutorial!! It's very detailed and easy to follow. You rock!
You're welcome so much!!
Thank you so much for sharing this. It's my nephews birthday tomorrow and I've made these for his party. Can't wait to see his reaction. (Wish I could post photos!)
Anshree! Post the photos on my facebook page or email them to me betsy@javacupcake.com I can't wait to see them!!!!!