
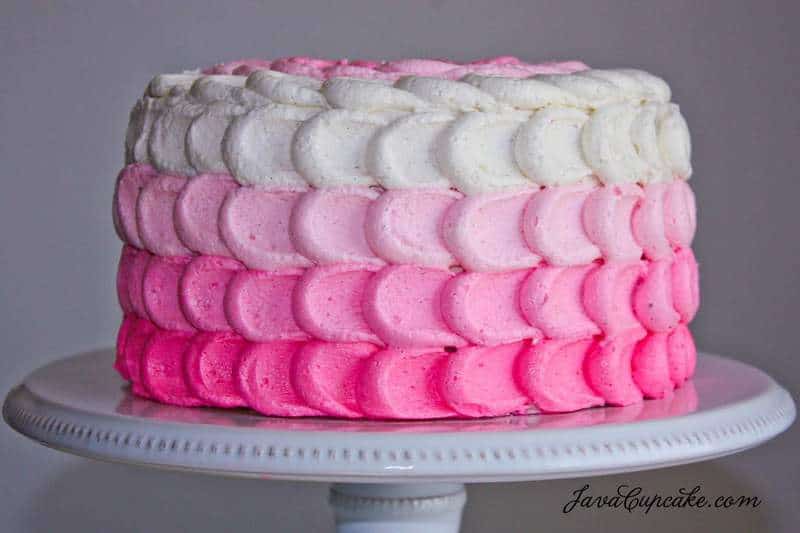
Chocolate Raspberry Ombre Petal Cake
Since I've been on a cake kick lately, I've been daydreaming non stop about what flavor to make next. I've been craving my favorite chocolate cake recipe and my fridge is fully stocked with raspberries so I knew I had to incorporate them into this cake. Next week I'm baking a cake for a birthday and thought today's cake would be the perfect opportunity to practice a new decorating technique before I have to make the birthday cake!

I really took my time putting this cake together. I started it about 11am and finished it around dinner time. The most time consuming part was the frosting, not making the frosting, but decorating with the frosting. The cake itself only requires 2 bowls and a small pot, no mixer required.
Ombre is a style of decorating where you use several shades of the same color to frost your cake, beginning with the darkest and continue with lighter and lighter shades of your color until it becomes white. This cake being raspberry, I figured pink would be the best choice. I used Wilton Gel color pink, separated my frosting into four parts, thentinted my frosting three shades of pink and left one white.

The Petal Technique uses a round tip on your piping bag and a small spatula to create the effect. It's a simple process, just very time consuming.
Since I'd never made a cake like this before, I did my homework and read several blogs about how to successfully create these looks on a cake. My favorite was from The Hungry Housewife. She posted a tutorial on her blog that demonstrated both the ombre and petal effect to decorate a cake. So, I watched this video, prepped my frosting and got to work!
I'm not going to include my step by step on how I decorated the cake, I'm going to let you read what The Hungry Housewife wrote... why reinvent the wheel. But, I will give you the recipe for the cake I made and the raspberry filling.
Let's talk about the cake for a second...

Dark chocolate, rich, dense and moist. This is my FAVORITE chocolate cake recipe OF ALL TIME. Yah, it's that good. And like I said before, no mixer required to make this cake... which makes it even better. I've used this recipe for cupcakes before, but I'd never transitioned it into a cake, but it preformed wonderfully in cake pans!
Raspberry filling... nothing better next to chocolate than this raspberry filling. Can I tell you a secret? Last night, after the cake was finished, I spooned this raspberry filling onto extra pieces of chocolate cake and shoveled it into my mouth. Actually, I made raspberry sandwiches with it... two pieces of cake filled with raspberry. Decadent. Heavenly.
A few things I realized during this cake that will make your cake making process a lot easier...
- PLAN AHEAD! Decide what colors you want to use, what cake flavors you want to use and go over all your recipes and tutorials before you begin. Be thorough so there are no surprises.
- Make sure you have all your tools ready. You really want to have enough bags with the same tip prepared and ready to go when you start piping. It will make this process 100x easier.
- Go slow. Take your time. Don't rush it. I know I get excited making new things and sometimes rush... but really, take your time. Breathe and enjoy the process!
I really hope you try this cake for your next special occasion. Your friends will be super impressed. I'm even impressed with myself. 🙂

Chocolate Raspberry Cake
Ingredients
Chocolate Cake
- 1 cup unsalted butter (2 sticks)
- 1 ½ cups brewed coffee
- 1 tablespoon espresso powder
- 1 tablespoon vanilla
- ¾ cup dark chocolate cocoa powder
- ⅔ cup sour cream
- 2 eggs
- 2 cups sugar
- 2 cups flour
- 1 ½ teaspoon baking soda
- ½ teaspoon salt
Raspberry Filling
- 4 cups fresh raspberries
- 3 tablespoon butter
- ½ cup sugar
- juice of a lime
- 2 tablespoon corn starch
- pinch of salt
Vanilla Buttercream for filling
- ½ cup unsalted butter, room temperature
- 1-2 tablespoon cream cheese, room temperature
- 1lb powdered sugar
- 2 teaspoon vanilla
- vanilla bean - split the bean and scrape seeds from one half of bean
- ⅛ teaspoon salt
- 2-3 tablespoon milk
Vanilla Buttercream for icing
- 1 cup unsalted butter, room temperature
- 3 tablespoon cream cheese, room temperature
- 1 cup shortening
- 2 ½ lbs powdered sugar (about 10 cups)
- 2 tablespoon vanilla
- seeds of 1 ½ vanilla beans
- ¼-1/2 cup milk
- Wilton Food Coloring Gel - Pink
Instructions
Dark Chocolate Cake
- Preheat oven to 350 F degrees. Grease and flour 4 8in cake pans.
- In a medium sauce pan, melt the butter. Add the coffee, espresso powder, cocoa powder, and vanilla and whisk until combined. Set aside to cool slightly.
- In a large bowl, sift together the sugar, flour, baking soda and salt. Set aside.
- In a medium bowl, whisk together the sour cream and the eggs. SLOWLY add a few tablespoons of the chocolate mixture to the sour cream and eggs. Whisk to combine. In a slow stream, whisk in the remaining chocolate mixture until combined completely.
- Make a well in the center of the flour mixture and pour in wet. Using a whisk, stir until no more lumps remain.
- Divide the batter evenly into the 4 prepared pans. Each pan should get about 1 ½ heaping cups of batter.
- Bake 23-25 minutes or until a toothpick comes out clean. Cool in pan for 10 minutes before removing from the pans to cool on a wire rack.
- Once the cakes have cooled, but are still warm, using a cake leveler to cut off the round mound on the top of the cake. Make sure all four layers are the same size.
Raspberry Filling
- In a large pan, melt the butter.
- Add the raspberries, sugar and lime and bring to a simmer over medium-high heat. Stir continuously so that the raspberries begin to break down.
- Add the corn starch and stir to combine. Continue to cook until the raspberries thicken, about 2 minutes.
- Stir in the salt.
- Remove from heat and allow to cool completely before filling cake.
Buttercream (you'll use the same method to make both buttercreams)
- In the bowl of your stand mixer, cream together the butter and cream cheese (shortening too if you're making the bc for the outside of the cake).
- One cup at a time, add the powdered sugar and mix until smooth.
- Mix in the vanilla extract, vanilla bean seeds and salt.
- Add enough milk until you reach your desired consistency. Mix on high for about 5 minutes.
To color the frosting:
- Divide frosting into four bowls. Set one aside that will remain white. Using a toothpick, dab a VERY SMALL amount of the pink dye into one bowl and mix until uniform in color. Use a little bit more color in the next bowl and even more color in the final bowl. The colors should get gradually darker.
To assemble the cake:
- Place the first layer of cake on a cake board/cake stand. Using the first batch of buttercream, make a border of frosting on the top of the cake along the edge. This will create a space for the raspberry filling and keep it from oozing out the sides.
- Fill the top open space with ½ cup of raspberry filling, spreading evenly.
- Place the second layer of cake gently on top. Spread a ½ inch thick layer of buttercream evenly on top.
- Place the third layer of cake on top of the frosting and repeat the process used for the first raspberry layer.
- Finally, place the last cake layer on top. Using the remaining frosting to crumb coat the cake.
- Freeze cake for 20 minutes before frosting.
Petal Cake Frosting Technique
- Visit The Hungry Housewife for a complete petal cake frosting tutorial.


OMG ... This is totally gorgeous!!!
This cake is spectacular,Watched the how to but how do you finish the last petal?mwhen they meet? Help!
That seam is on the back side of the cake. It's kinda hard to make look pretty... just do you best!
Hi Betsy, I cannot seem to find expresso powder. Can I substitute something or leave out? Help! Wanted to bake for my girlfriend today?
You can omit it. It's not so critical to the recipe that it won't still be great without it!
Thx so much for speedy reply!
Turned out gorgeous and yummy dispute dropping one of the layers when removing from the oven! No one needs to know it was to be four layers! Raspberry filling got rave reviews. Any ideas for leftover filling? If not will just have to eat on toast!
Awesome!! Did you take a picture? 🙂 And yes... always have left over filling. I use it on ice cream. LOVE it on ice cream. But really, just keep it in the fridge and put it on toast or anything. It's sooooooooooooo delish!!! xoxoxox
Wow, this is an amazing cake!
did you see that some cooking school is using one of your ombre cake photos in a Facebook ad? I saw the photo and it actually grabbed my attention because it is so beautiful and eye catching. I wanted to get to the source and find out where the photo came from so did a google images search and voila, I found myself here. I love the tutorial, great job.
the company using the photo is called baking.associatedegree.us.com
just thought you might want to know
I had no idea. I'll check it out. THANK YOU for letting me know!
Raspberry filling sounds super amazing Must give it a try. Yummy!
Help! I'm trying to make this cake and every time I do it sticks to the pan, even after I grease and flour. What am I doing wrong? BTW, the cake, even in crumbles, tastes delicious =)
Hi LaDonna! Have you tried putting parchment paper down on the bottom of the pan? Grease, parchment, flour. I do that every time and have no problems with sticking. Good luck!
This cake is a failure and you really should take it down. I so wish I had read the reviews. I was inerested in the addtion of the coffee and wanted to try it, but the cake is for a party two days from now. Only two of the four layers would release from the pan and I used my tried and true shortening and flour. NEVER fails. This time it did. 10+ years of cake making. So VERY disappinted. Ladies and Gentlemen just use the box mix. This had the most beautiful batter EVER, but the cake is too weak to be removed from the pan. It's just too soft.
Sometimes some bakers aren't meant to be. Proper preparation of your cake pans is essential to ensuring cakes come out of the pan EVERY time. Shortening, flour AND parchment paper are key to cakes that come out of the pan every time. Maybe if you would have read that part of the comments BEFORE you made this cake and followed my advice, your cake would have come out of the pan. 10+ years of experience doesn't always make you a perfect baker. So no, I won't take this cake down... because I have made this cake 100+ times without issue and without it sticking to the pan. So yeah, happy baking Trish.
I love this cake and make it so much - it's a crowd favourite! I was wondering whether you could help with timing for how long to cook if I have to split into only 2 pans rather than the suggested 4.
I just don't have the space for 4 pans so have just been guessing each time I make the cake! 🫣
There is twice as much batter - so you know it'll be longer. It's start with 25 minutes and give it the toothpick test. Add five more minutes if it needs it. Keep checking. Don't open before 25 mins or the call will fall.