
Surprise your family and friends with your baking skills by making this Toy Story themed checkerboard petal cake! With a little work, preparation and time… you can make a cake that will WOW everyone!


This is the final post in the Toy Story themed party series! And, I’m pretty certain I’ve saved the best for last with this Toy Story Checkerboard Cake! In case you missed the rest of the series… you can find them here:
- Sunnyside Toy Box Centerpiece
- Etch-a-Sketch table top food signs
- Sherrif Woody’s Star Cookies
- Jessie’s Hat Cookies
- Alien Cupcakes


Although this cake look really impressive, it was really quite simple to make. It just took some planning, patience and time to execute.
There were two main techniques of baking and decorating that I used for this cake. First was the checkerboard pattern I used on the inside of the cake. At Matty’s party, people actually thought I cut out little pieces of cake and reassembled it back together with frosting.


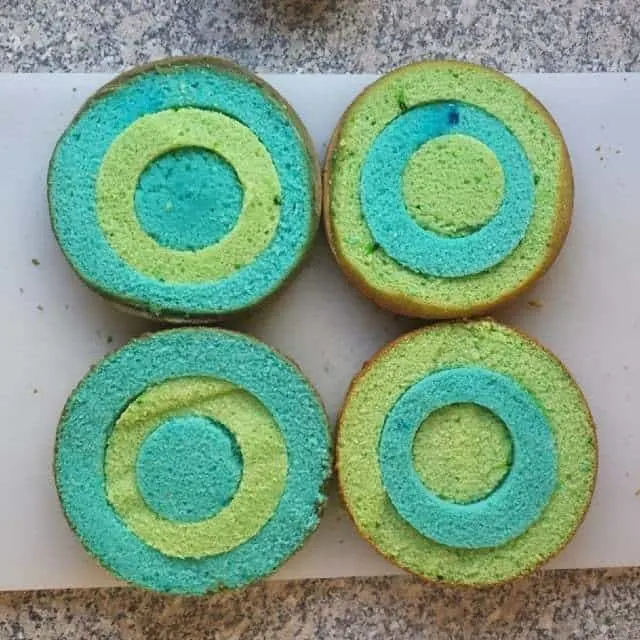
No no no no no no no. It’s SO much simpler than that. All I needed to accomplish the checkerboard effect was four cake rounds in two colors and two sizes of biscuit/cookie cutters.
I cut out rings of cake and then simple moved the rings from one color to another, creating a pattern. I stacked the cakes with a thin amount of frosting between each later and crumb coated the entire outside with frosting.
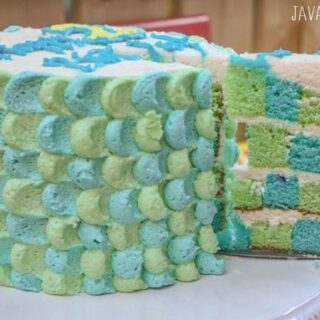
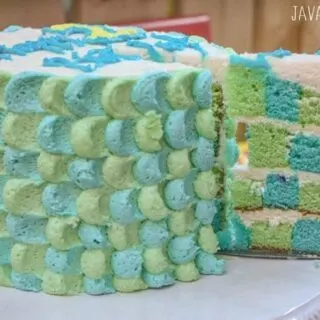
The decorating technique I used is called the Petal technique because you’re creating petals of frosting all around the cake. I’ve made this style of cake only once before, but it was a huge success and really quite easy. So I knew that I could make this cake with the same styling and it would turn out perfectly!


For the cake itself, I used i am baker’s recipe for The Perfect White Cake. I’ve used this recipe before and I’m certain I’ll use it again. It’s really a delicious recipe and the cake holds up really well to decorating!
Everyone at the party thought my cake was a huge hit. And most importantly, the birthday boy loved it! Every time he sees pictures of it, he says Buzz Buzz Buzz and does the happy-toddler-dance! It’s super cute.


I really hope you take the opportunity to try these cake baking and decorating techniques! And please, don’t feel overwhelmed either… they really are not that difficult and I hope that my directions below are clear and help give you the confidence to make it yourself!
If you love this cake, please PIN it to Pinterest and share it on Facebook with your friends! I’d love to hear about it if you try these techniques with your cakes too! Please, send me pictures!!
Happy Baking!
Toy Story Checkerboard Cake
Ingredients
Checkerboard Cake
- i am baker's Perfect White Cake - for the recipe CLICK HERE
- Green & blue gel food coloring
- 6in round cake pans
- 4in & 2in round cookie/biscuit cutters
Buttercream
- Vanilla buttercream - for the recipe CLICK HERE
- Green & blue gel food coloring
- 2 Large round piping tips
- 2 small round piping tip
- 4 disposable pastry/piping bags
- Yellow gel food coloring
Instructions
Checkerboard Cake
- Prepare the cake batter as directed in i am baker's recipe (link above).
- Instead of the 8in pans in her recipe, grease and flour 2 6in pans. You can also line them with parchment paper if your cakes like to stick to your pans.
- Using a kitchen scale, measure by weight half of the batter and color it green.
- Color the remaining half of the batter blue.
- Spread each color into it's own prepared cake pan.
- Bake 30-35 minutes or until a toothpick comes out clean. (Baking times vary depending on oven)
- Allow to cool in pans for 5 minutes before removing to cool completely.
Buttercream
- Prepare the buttercream as directed in the recipe in the link above. Just to be safe, you'll want to double the recipe so you have enough to work with. You'll probably have extra, but that's better than not having enough.
- NOTE: The coloring of the buttercream will happen later in the assembly process.
Assembly
- Prepare the cake layers by trimming off the domed top of the cake. Cut horizontally into each cake layer to make two even pieces. You'll want two green and two blue layers of the same size.
- Use the cookie cutters to cut 4in and 2in rings out of each layer of cake.
- Take the cake pieces apart.
- Reassemble the cake pieces so that each color is alternating. Blue green blue. Green blue green. You'll have two layers of each pattern once they have been reassembled.

- Place a piece of wax paper on your rotating cake stand and set one layer of cake down.
- With the white buttercream, spread a thin layer on top of the first layer of cake.
- Place the second layer of cake down, making sure the outside ring is the opposite color of the first layer. Spread another thin layer of frosting on top.
- Repeat this with the next two layers of cake, making sure the outside rings of cake alternate in color.
- Crumb coat the entire cake with white buttercream. Freeze for 20 minutes.
- Spread a 1/2 inch layer of white frosting over the top of the cake. Reserve 1/3 cup of white frosting for later.
- Divide the remaining buttercream in half. Color half green & half blue.
- Prepare 2 disposable piping bags with the large round tips. Fill one with blue and one with green frosting.
- Use the Petal Cake Frosting technique to frost the outside of the cake. Alternating with green & blue frosting with each petal. NOTE: For detailed instructions on how to frost using the petal technique, CLICK HERE FOR THE TUTORIAL .
- Color half the reserved frosting yellow and half blue. Fit the piping bags with the small tips and fill them with each color.
- Pipe a large number 2 on the top of the cake in yellow frosting and outline it in blue.
- Write Happy Birthday with the remaining blue frosting.
- Allow the cake to set up in the freezer on the rotating cake stand until firm - about 2 hours.
- Gently remove the cake from the stand and place it on the stand you will serve the cake on.
- Store the cake covered in the refrigerator until ready 2 hours before serving when you'll remove it to room temperature.
Helen
Sunday 16th of March 2014
You are an amazing woman! Love this cake.
Betsy Eves
Sunday 16th of March 2014
Awwww Helen!! Thank you!! <3
Julie Evink
Thursday 13th of March 2014
WOW! This is beyond gorgeous! You are amazingly talented!
Betsy Eves
Thursday 13th of March 2014
That's so kind of you, Julie! THANK YOU!
ALIDA RIVERA
Tuesday 11th of March 2014
Good
whatjessicabakednext
Saturday 8th of March 2014
This looks amazing- I love the colours! :)
Ashley @ Wishes & Dishes
Saturday 8th of March 2014
This is way too cool!!!